|
Getting Started
Successful deck building requires correct site preparation. For the best results
clear the area of all weeds, sods etc. and apply a proprietary weed killer. Slope
the area slightly to allow water to drain off. Lay black polythene sheeting over
the area, cover with gravel and blind with sand to prevent regrowth. If the decking
is being attached to the house, the final level should be two brick courses below
the damp course level, obstacles such as drainpipes can be redirected.
There are two types of basic deck construction, ground level and elevated, the latter
being useful where the ground slopes away or when you want to create a deck on different
levels.
|
|
|
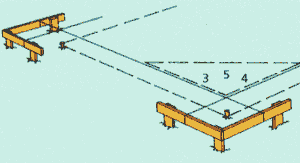
To help create a square deck and determine overall size, mark out the proposed area
using a basic building technique, which involves using 'batter boards', pegs and
string lines. To check that corners are 90 degrees use a '3-4-5' triangle either
constructed from wood or marked onto the string lines.
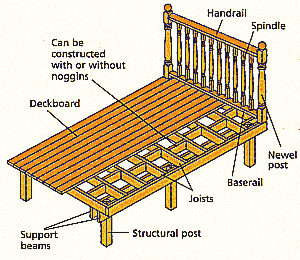
Deckboards are normally fixed at right angles to the joists, they can overshoot the
edge of the joists at the ends or be trimmed flush with the joists and a facia board
added for a more decorative and neat finish.
|
|
|
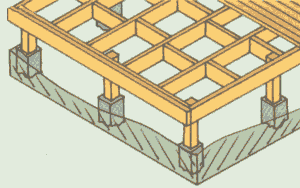
Raised/Elevated Deck
- (Richard Burbidge) structural 100x100x1200mm deck posts should be used for elevated
decks.
- Richard Burbidge recommend that at least half the length of the post is sunk into
the ground and fixed with concrete. (For elevated decks above 600mm we recommend
that you consult a builder).
- Joists should be spaced at a minimum of 400mm centres.
- Structural posts should be positioned no more than 1800mm apart.
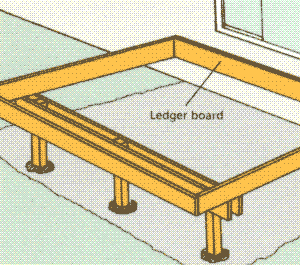
- Elevated decks can be free standing or have one or more sides attached to a wall/side
of house.
- The finished deck must be at least two brick courses below damp course level.
- Use a joist and spirit level to mark the joist/ledger height on the wall.
- To give added structural stability and support, fix two joists together using coach
screws to form the joist ledger and fix to wall using wood to masonry fixings.
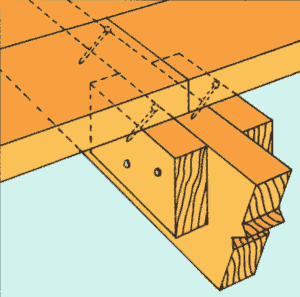
- Mark the depth of a joist onto the structural post and fix joists/beams either side
using coach bolts/screws.
- These beams accommodate the frames joists. Fix the joists to the beams by skew-nailing
or use seismic/hurricane ties. Although not essential, noggins can be fitted for
additional strength at 90 degrees to the structural joists.
- To fix joists to the joist/ledger use joist hangers.
|
|
|
|
|
|
|
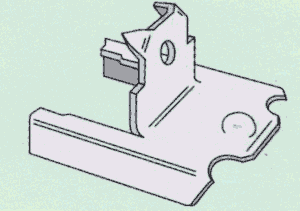
Secret Fix Using Deckboard Ties
You can eliminate installation damage by using deck ties and because there are no
nails in the surface there is no rust staining or danger of damage to bare feet.
The smooth unbroken decking is also easier to maintain.
|
|
|
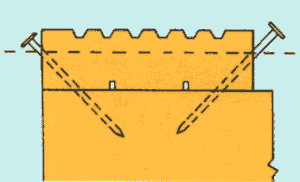
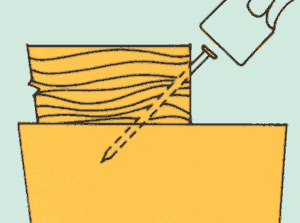
The first deckboard should be fastened to the joists by skew-nailing both edges using
75mm galvanised nails. Note - If positioned against a fixed point such as the side
of a house, it will not be possible to skew-nail the back edge of the first deckboard,
which should be fixed to the joist by nailing or screwing through the face of the
board and the nail heads punched below the surface and filled.
|
Set the next deckboard on edge and use the locator prongs to position the deck ties
tight against the bottom of the deckboard (within 50mm of each joist - but not on
the joist itself). Fasten with 37mm galvanised nails.
|
|
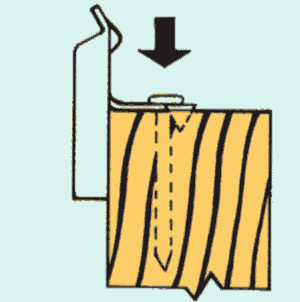
Place the board so that the tie connectors slide tightly under the previously anchored
deckboard.

|
Knock the new deckboard firmly up against the previously anchored deck.
Skew-nail the front edge of the deckboard into the top of each joist.
|
|
This procedure is repeated for each deckboard until all boards have been fixed. Anchor
the final edge by skew-nailing.
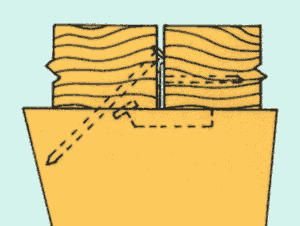
Unless your deck design is based on standard lengths, you will need to stagger the
boards to cover the deck area.
For safety and to prevent movement, staggered boards must always meet over a joist.
|
Use additional sections of joist or deckboard to increase the area for skew-nailing.
|
|
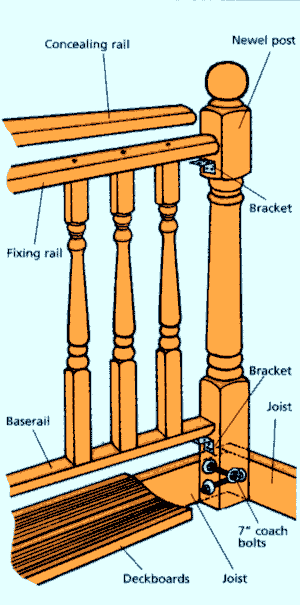
Fitting Balustrading
- Balustrading will add a decorative effect to ground level decks and must be used
on elevated decks for safety. Newel posts should be fixed to joists prior to installing
the deckboards.
- Newel posts are fixed to joists using 175mm coach bolts, where possible fix newels
so that two faces can be fixed through two joists at 90º to each other.
- Newels should be set to accommodate a minimum handrail height of approximately 900mm
above deck level.
- For safety we recommend a maximum span between posts of 1800mm. For spans greater
than this use additional posts.
- Once posts are fixed, measure the distance between faces of newels and cut rails
to suit.
- Fix spindles to rails using No. 8 63mm galvanised screws.
- When using the rail as a baserail ensure the broove races downwards.
- Spindles should be placed at approximately 120mm centres, giving a maximum gap between
spindles of 100mm.
- Fix handrail bracket to the underside of the bottom rail using 2xNo. 8 25mm galvanised
screws.
- Offer up unit between posts, allowing for the bottom rail to be approximately 75mm
above deck level, mark and fix handrail brackets to head of newel using 2 x 37mm
galvanised screws.
- Finally, fex bottom bracket to the face of bottom of newel and bracket to underside
of top rail.
- To hide visible screw fixings through the top fixing rail, place an additional concealing
rail on top and fix through the underside of the lower rail using No. 8 37mm galvanised
screws.
- If using a standard handrail, fex spindles by either: skew-nailing, nailing or serrated
dowel. Fix through the top of the rail, attach rail to newels as previously directed.
|
|
|
|
|