
(Based on instructional booklet from the Nordic Timber Council -
|
|
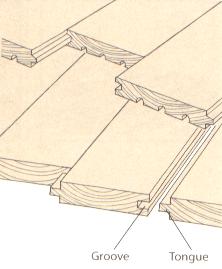
Solid Timber Flooring This page deals with solid timber flooring in pine and spruce. The floorboards are tongued and grooved. Spruce boards have a light, even colour which will yellow a little over time. The natural colour of pine boards is divided into lighter outer wood and a darker heart. The difference in colour will gradually become more pronounced when the heart wood darkens. |
|
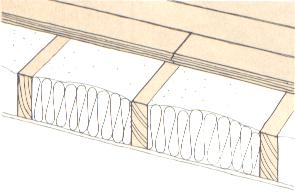
Timber Flooring on Joists Timber flooring in dwellings which is nailed to floor joists can be as little as
19 mm thick if the joists are positioned close together. If the intervals between
the joists are greater than 600mm, the thickness may have to be increased to 25- |
|
|
|
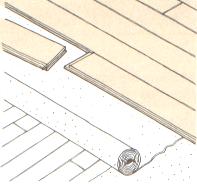
Floating Timber Flooring A thin floating timber floor is a type of flooring which is common in renovations and can be laid on most types of base, e.g. well dried concrete, flooring sheets, or an original floor. Prepare the base so that it is firm, flat, and dry. An original floor should be provided with an intermediate layer of material such as flooring paper. This method is best suited to permanently heated areas. The floor is not nailed onto the base but is laid loose with glued joints. In renovations particularly, it is often desirable that the flooring should not be too thick. However, taking functionality and lifespan into consideration, it is as well not to choose solid timber flooring less than 16mm thick. |
|
Preparation To minimise the moisture movement of timber floors, it is vital that the timber is
of a moisture content equivalent to the conditions in the room where it is to be
laid. If it is too high, the timber will shrink, opening up the joints between boards.
Although small gaps may be acceptable, timber laid at a normal moisture content of
14- To reduce this problem in heated buildings, the moisture content of the boards should
be reduced to 10- |
|
|
Tools and Equipment The correct tools and accessories make the work easier. You will need a hammer, nail
punch, crowbar, fine- Depending on thickness, timber flooring is nailed onto joists using brads 60mm to 75mm long. Spacers made from fibreboard sheeting and small wooden wedges are used when laying flooring against walls. |
|
|
Timber Consumption Timber consumption, pine or spruce floor boards, running metres/square metre (not including wastage). |
|
|
Width planed measurement mm |
Cover width mm |
Timber consumption rm/sq. m |
|
120 145 170 |
111 137 162 |
8.9 7.3 6.2 |
|
|
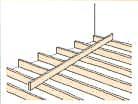
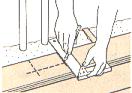
Before laying, check that the floor joists are flat and levelled. Do this with a metal rule or spirit level at least 3 m long, laid diagonally across the joists. Adjust any unevenness by planing or levelling with strips of thin fibreboard sheeting, to avoid creaking. Begin by laying the first board with its grooved side towards one wall. If several lengths of board are used , you should be careful that they are lying in a straight line. Do not rely on the wall being true. Check using a plumb line. Using spacers, leave a few millimetres for movement against the walls. Always place the end joints above a joist and, for appearance, distribute end joints evenly over the floor area. |
|
|
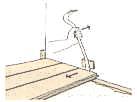
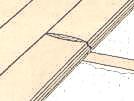
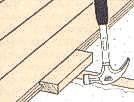
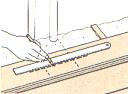
To get an end joint in the middle of a board to be as tight as possible, the joints
are pressed together using a crowbar against the wall. Boards which are not end- |
|
|
End joints should not be positioned too close to each other. No more than every third board should be butt jointed on the same joist. |
|
|
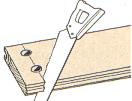
The first floorboard is nailed from above, so close to the wall that the nail hole is covered by the skirting board. The front edge is nailed down obliquely and is covered in the upper corner of the tongue. Use a nail punch on the nails. |
|
|
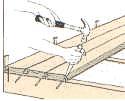
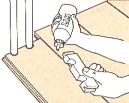
Knock the next floorboard into the previous board using a hammering block. Make this
block from a split floorboard. Repeat the procedure and nail down the floorboards
one by one. Where there is a risk of splitting the edge of a board, e.g. close to
an end, pre- |
|
|
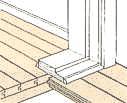
At doors, where possible, feed in the boards so far that the threshold covers the joint. Leave an allowance for movement against the flooring material from the adjoining room. If the floor is not lying at the same level, wedge up to the threshold from the lowest floor level. In openings with no threshold, use wooden or metal covering strips. |
|
|
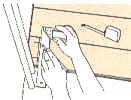
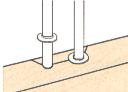
Make holes for pipes at the end of boards so that the board for fitting is placed on top of the last board to be laid next to the pipes. Use the set square and tape measure to transfer and mark the pipes' diameters and position. |
|
|
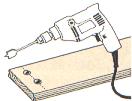
Drill holes 5 to 10mm larger than the pipes. |
|
|
Then cut the board to be fitted through the centre line of the hole and put in position. |
|
|
Glue on the small back piece behind the pipe using spacers against the wall. |
|
|
Holes in the length of the floorboards can be made for pipes by placing the board in question in the correct position immediately above the nearest neighbouring board. Measure the distance between the edge of the board and the pipes and mark it on the board being fitted. |
|
|
Use a set square to transfer and mark the outer edges of the pipes. |
|
|
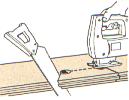
When the holes have been drilled for the pipes, saw out the back piece using a tenon saw or electric jig saw. |
|
|
Once the board is put into position, glue the back piece into place and tension it with wedges against the wall. |
|
|
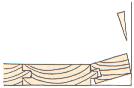
The last board usually has to be cut along its length. Along a board above the penultimate board to be laid and the mark for cutting as shown. |
|
|
Cut the marked board along the line. |
|
|
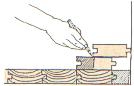
It is sometimes a good idea to lay the last two floorboards at the same time. They are normally wedged against the wall. Nail the last board from the top and as close to the edge as possible. The nails should be covered by the skirting board. The distance of the board from the wall should be a few millimetres to allow for movement. Remove all spacers and wedges before nailing down the skirting board. |
|
|
|
|
Surface Finish Normally, factory varnished timber flooring will need no further surface treatment.
Timber flooring with a moisture content of less than 10% should be protected with
plastic sheets or should be laid as late as possible in the building process to avoid
damage and moisture absorption. Spruce and pine floorboards usually come ready for
surface treatment. Sometimes, one last fine rub- Clear varnishing retains the appearance of the wood and functions as a protective
layer which is easy to look after. Initially, three coats should be given. The room
temperature should be 15- Clear varnish can cause adhesion between the boards, which causes unevenly distributed shrinkage cracks. It is therefore important that the flooring should be really dry while it is being varnished. Prior to varnishing, the floorboards can be stained to give varying colour effects. Surface finishes are available in a wide range of colours. Oiling timber flooring gives a pleasant surface but needs more frequent maintenance. The surface may be sensitive to stains. Local stains can be removed with an oil rub using fine sandpaper. As a rule, oil is unpigmented although pigmented oils do exist. Treating with lye retains the lightness of the wood for a long time. To make it easier
to clean a lye- |
|
|
Maintenance It is possible to hire floor- The old surface treatment of timber flooring can be sanded clean. Prior to sanding, make sure all proud nails are hammered down (use a nail punch) and treat the floor with wax polish or white spirit so that the sanding belt is not applied too aggressively. After sanding and vacuum cleaning, treat the surface of the timber floor as if it were new. |
|