
Fitting Balustrades
(Based on instructional booklet from Richard Burbidge Decking Systems)
(Based on instructional booklet from Richard Burbidge Decking Systems)
Getting Started
Balustrades will add a decorative effect to ground level decks and must be used on elevated decks for safety.
Richard Burbidge recommend that balustrading should be assembled and fixed to joists before installing deckboards.
Decking and balustrading are designed for ground level and elevated installations up to 600mm. For elevations above 600mm consult a builder.
To conform with Building Regulations, the maximum recommended length of balustrading between posts is 1800mm. For lengths in excess of this additional newel posts must be used.
Decking Balustrading Bolt Fixing
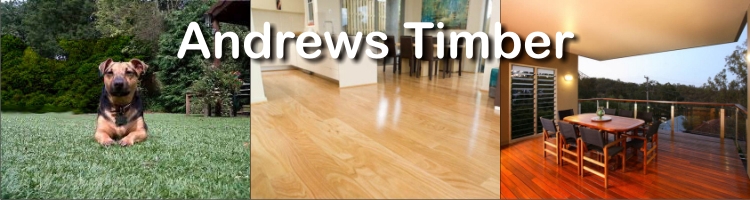
Balustrading is best assembled on a clear, flat surface such as a garage floor. Establish where you would like the top of the handrail to be in relation to the newel post. This can be done using a small offcut of handrail. Draw around the handrail profile onto the face of the newel.
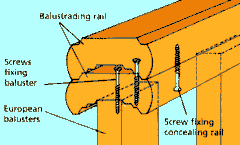
The treated and cedar balustrading rails (66mm width) are designed for use with a concealing rail, so when drawing onto the face of the newel for these handrails remember to draw teo rails, one on top of the other. The lower rail will be the rail that is fixed to the newel.
Balustrading is best assembled on a clear, flat surface such as a garage floor. Establish where you would like the top of the handrail to be in relation to the newel post. This can be done using a small offcut of handrail. Draw around the handrail profile onto the face of the newel.
The treated and cedar balustrading rails (66mm width) are designed for use with a concealing rail, so when drawing onto the face of the newel for these handrails remember to draw teo rails, one on top of the other. The lower rail will be the rail that is fixed to the newel.

The large cedar and American rails do not require a concealing rail and are used for both handrail and baserail.
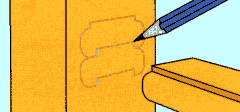
For the balustrading rails, drill the end section of the handrail using an 8mm diameter wood bit to a depth of 60mm at a distance of 10mm up from the groove in the rail.
Turn the handrail over and in the groove of the balustrading rails at a distance of 60mm from the end of the handrail drill a 35mm diameter hole to a depth of 18mm using a hinge drill/forstner bit or similar to create an access hole for fitting the balustrading bolt. You will find drilling of the treated balustrading rail easier if you chisel a rebate in the smallest groove of this rail.
The American rail is drilled in the centre of the rail using an 8mm wood bit to a depth of 60mm and a 35mm access hole is drilled on the side face of the rail.
Drill the other end of the handrail in exactly the same way.
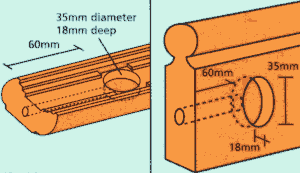
On the face of the previously marked newel post measure up from the groove of the lower pencil drawn handrail section a distance of 10mm. For the American rail measure up 60mm. Drill the newel post at this point using a 9.5mm diameter drill bit to a depth of 25mm. Screw the threaded insert part of the balustrading bolt into the newel post using a 6mm Allen key. Mark and drill the remaining newel posts in exactly the same way and fix the inserts into position.
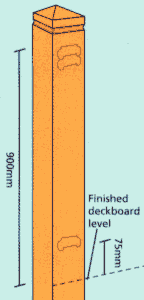
Balustrading and American rails are also used as baserails with the groove facing downwards on the balustrading rail. Measure down the face of the newel from the top of the handrail a distance of 900mm and draw a line, which will represent the finished deckboard level. From the deckboard level measure up 75mm and using the offcut of handrail draw the profile of the rail onto the face of the newel, allowing for the bottom edge of the rail to be level with the line at 75mm above deckboard level.
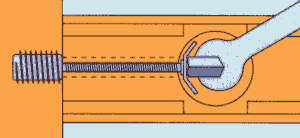
Screw the threaded bars into the inserts in the newel posts and position the rails onto threaded bars. Using the spanner supplied, tighten all rails to newel posts with the combinedpressure plate and nut/s of the balustrading bolt. For the American Rail use a "Richard Burbidge" treated cover cap to hide the access hole. Secure using exterior grade wood glue or silicon. For the treated balustrading rai, ensure the access hole is treated using "Richard Burbidge" end coat.
Newel Posts
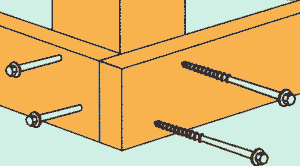
Newel posts are fixed to joists using 100mm landscape screws, where possible fix newels so that two faces can be secured through two joists at 90º to each other.
Cedar Posts
Cedar porch and lamp post
Position of posts should be established at the planning stage of your deck. Ideally posts should be fixed to the sides of joists and braced/boxed with off-cuts between joists. For structural stability
Newel posts are fixed to joists using 100mm landscape screws, where possible fix newels so that two faces can be secured through two joists at 90º to each other.
Cedar Posts
Cedar porch and lamp post
Position of posts should be established at the planning stage of your deck. Ideally posts should be fixed to the sides of joists and braced/boxed with off-
and rigidity fix the posts to a joist depth of at least 300mm (2x150mm joists on top of each other). You will need to use 150mm landscape screws for fixing the porch post and lamp post to a joist, screw either side of the wiring space of the lamp post. Although not intended for ground contact, if the deck is low level it will be necessary to sink the posts into the ground. Apply a waterproof preservative to the part of the post that will be in contact with the ground and cap off the concrete so that ground water runs away from the post rather than onto it.
Cedar corner chamfered newel post
If desired the cedar ball cap or patrice cap can be fitted to finish the post. Use the screw fixing on the ball cap to screw into the newel. Fit the patrice cap with a proprietary exterior quality wood glue.
36mm Cedar Spindles
36mm cedar spindles are fixed in the same way as detailed below except spindle centres should be set at 116mm.
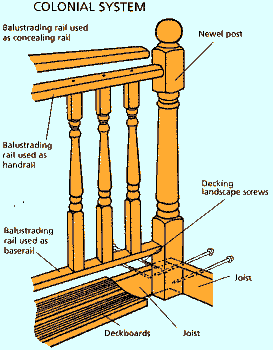
Colonial Spindles
The Colonial System uses one style of balustrading rail for handrail, baserail and concealing rail.
The Colonial System uses one style of balustrading rail for handrail, baserail and concealing rail.
|
1.
|
Fix spindles to rails using No. 8 63mm galvanised screws.
|
|
2.
|
When using rail as a baserail, ensure the groove faces downwards.
|
|
3.
|
Spindles should be spaced at approximately 120mm centres, giving a maximum gap between spindles of 100mm.
|
|
4.
|
Offer up complete unit including posts, allowing for the bottom rail to be approximately 75mm above deck levels.
|
|
5.
|
To hide visible screw fixings through the top fixing rail, place an additional rail on top and fix through the underside of lower rail using No. 8 40mm galvanised screws.
|
Cedar 57mm option
The 57mm balustrading rail is used as a handrail and baserail but does not cap itself. Newels should be set and fixed as previously
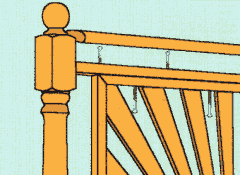
Use of Second Baluster to hide screws
Place on top of handrail to cover screws holding spindles and screw in from below.
(See Colonial and European Balusters)
(See Colonial and European Balusters)
detailed. When using the rail as a baserail ensure the groove faces downward, fix to the newel as previously detailed.
Spindles should be spaced at approximately 137mm centres, giving a maximum gap between spindles of 100mm, fix using one of two methods.
Fix through the top of the rail into the spindle using 63mm galvanised screw (visible fix) or alternatively counter bore and use a plug cutter to hide the head of the screws with cedar flush pellets (invisible fix).
The spindles can also be fixed from the underside of the handrail using No. 8 63mm galvanised screws. Pilot drill the spindle at 45º approximately 25mm from the ends of the spindle and screw through the spindle into the handrail/baserail.
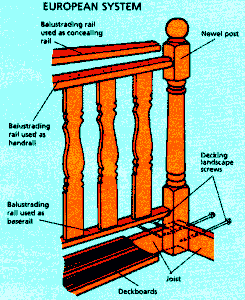
European Balusters
The European System uses one style of rail which is used as handrail, baserail and concealing rail. These balusters can also be used with the American balustrading system.
The European System uses one style of rail which is used as handrail, baserail and concealing rail. These balusters can also be used with the American balustrading system.
|
1.
|
Cut balusters to the required length to suit your particular balustrading height.
|
|
2.
|
The balusters are set in place at 150mm centres.
|
|
3.
|
Using exterior grade PVA glue, locate the end of the baluster into the groove in the handrail and screw into position, 25mm in from each edge in both the handrail and the baserail using 63mm galvanised screws. To disguise the screw heads add a concealing rail fixed in position by screwing from below.
|
|
4.
|
European balusters can be used with the American rail. To fix, position the balusters to the outside face of the rail and secure with a minimum of 2x40mm No. 8 galvanised screws top and bottom. To fix balusters see American system point 2.
|

American Balusters
|
1.
|
American balusters can be left square or cut at an angle to match the top surface.
|
|
2.
|
Space American balusters at 125mm centres, drill, countersink and fix to the side of the top and bottom rails using 40mm No. 8 galvanised screws. European balusters can be used instead of American balustrading if preferred.
|
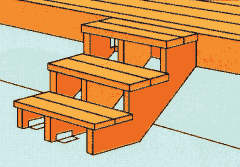
Fitting Steps
The height and positioning of your deck will also influence the style anf height of your steps. You may also require a handrail to comply with local authority guidelines.
The Richard Burbidge Decking System includes two sizes of cut string for step building: 3 steps/570mm rise and 5 steps/950mm rise.
|
1.
|
The number of steps required will be determined by the height of the deck and the space in front of it.
|
|
2.
|
The strings should be positioned at right angles to the deck joist. The base of the string may need to be cut at an appropriate angle to allow it to sit firmly on the ground, preferrably on a solid area, ie flagstones/concrete etc.
|
|
3.
|
The strings should be set at a maximum distance of 400mm centres.
|
|
4.
|
Once fixed using suitable galvanised brackets/joist hangers, we recommend the treads are traditionally fixed through the top face of the deckboard using 75mm No. 8 galvanised screws.
|
|
5.
|
Treads are created by cutting deckboards to length, allowing 30mm to overhang each string.
|
Decorative Infill Treated Panels
Treated panels should be used with treated balustrading rail and set with a maximum gap of 100mm between the newel and beginning of the panel.
|
1.
|
Fix the panel into the rail using No. 8 63mm galvanised screws.
|
|
2.
|
When using the rail as a baserail, ensure the groove faces downward.
|
|
3.
|
Fix the handrails to newel posts using the decking balustrading bolt as previously described.
|
|
4.
|
To hide visible screw fixings through the top fixing rail, place an additional rail on top and fix through the underside of the lower rail using No. 8 40mm galvanised screws.
|